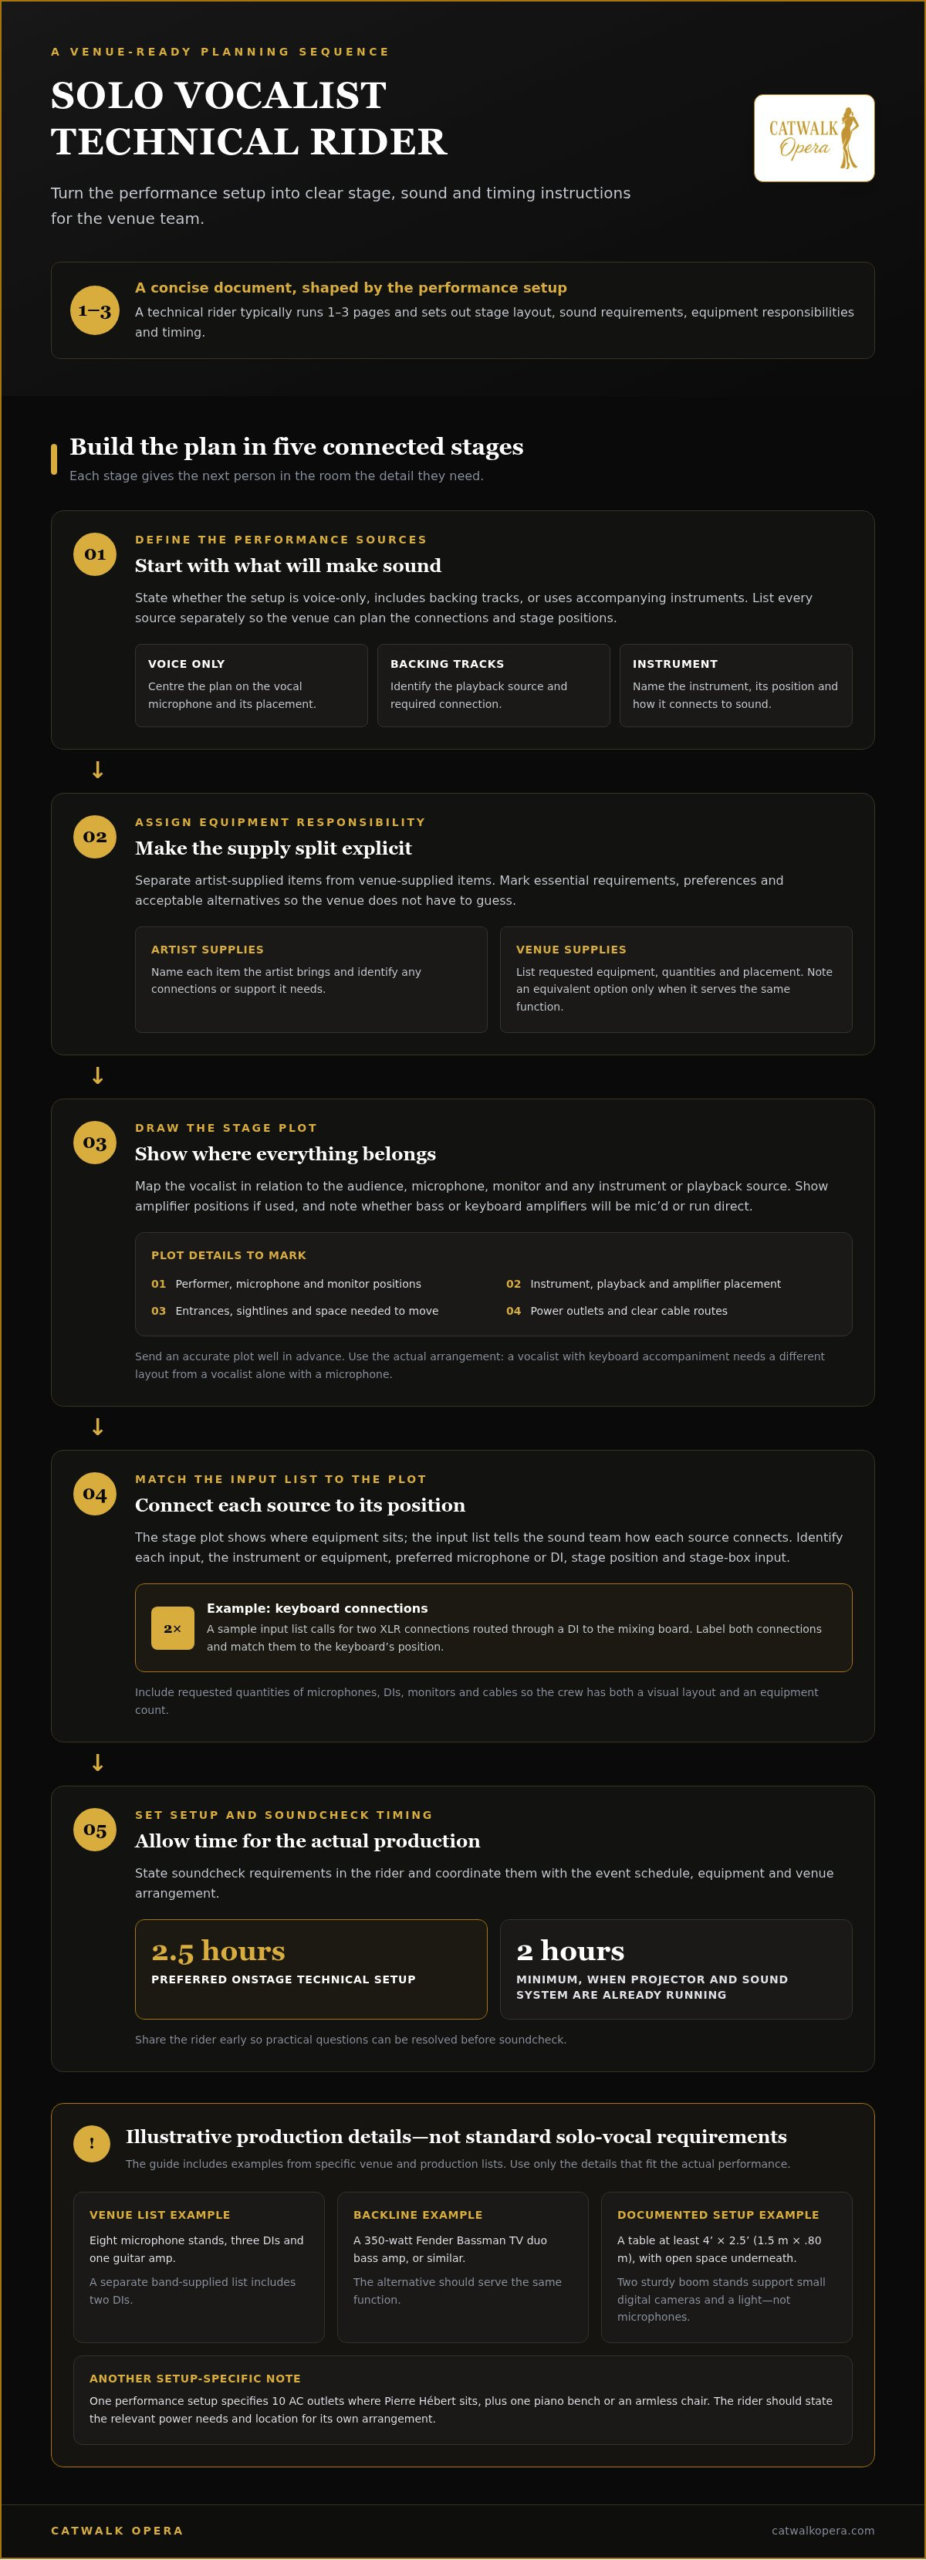
A flawless vocal moment is planned long before the first note. A technical rider for a solo vocalist sets out the stage layout, sound requirements, equipment responsibilities and timing the venue team needs to prepare. It is usually a concise document of 1-3 pages, shaped by the performance setup.
Even a solo performance depends on clear coordination. The vocalist may bring some equipment, while the venue supplies other items and supports the sound setup. A well-defined rider makes those responsibilities clear early, reducing the chance of practical questions surfacing at soundcheck.
This guide explains what belongs in a rider, how a stage plot and input list clarify positions and connections, and how to distinguish artist-supplied equipment from venue provisions. It also covers planning soundchecks and setup around the event schedule, so the performance fits the room, programme and visual direction of your occasion.
Key Takeaways
- A technical rider typically runs 1-3 pages and gives the venue team the practical details needed to prepare for a performance.
- Separate artist-supplied equipment from venue-supplied items, and identify the essential rider requirements clearly.
- Use a stage plan to show performer, microphone and monitor positions, and a channel list to clarify inputs and connections.
- Set out sound-system and engineer requirements in advance so key arrangements are clear before soundcheck.
- Share the rider early and allow setup timing to reflect the equipment, venue and performance arrangement.
Artist-supplied and venue-supplied equipment
A technical rider for a solo vocalist separates what the artist brings from what the venue must supply. Backing tracks or instruments change the input and equipment requirements, so list each element and state who is responsible for it.
Sound Equipment and Acceptable Alternatives
This list identifies the sound equipment requested and any acceptable substitute; clear alternatives help the venue prepare without changing the intended setup. Name the required item first, then describe an equivalent option only when it will serve the same function. For example, a sample venue backline list requests a 350-watt Fender Bassman TV duo bass amp or similar. “Or similar” allows a suitable alternative, rather than leaving the venue to guess.
Separate essential requirements from preferences. If a microphone stand is needed, state the quantity and placement; if the artist supplies an item, label it accordingly. Sample lists can show how responsibilities are divided: one venue list includes eight microphone stands, three DIs and one guitar amp, while a band-supplied list includes two DIs. These are examples, not a standard solo-vocal setup. Your rider should reflect the actual performance.
Backline and Setup Stability
Backline refers to the performance equipment and supporting setup on stage. Clear placement details help the crew arrange it consistently. Specify where each item belongs, which items need a stand or table, and what must remain accessible during the performance.
One documented production setup calls for a table at least 4’x 2.5’ (1.5m x .80m), with open space underneath. It also requests 2 sturdy boom microphone stands to hold small digital cameras and a light, not microphones. These are particulars of that setup, not standard requirements for every vocalist. If your performance uses similar equipment, state its purpose and support needs explicitly.
For each table, stand or instrument, describe its intended position and what it must support. Identify cables that should stay clear of walking routes, especially where the artist enters or moves during the performance. These practical notes link equipment placement to the stage design, helping the crew create a stable setup without disrupting the visual arrangement.
Backing Track and Instrument Configurations
This section of the rider distinguishes a voice-only setup from one using playback or instruments. Each added sound source affects connections and stage placement. For backing tracks, identify the playback source and required connections. For an accompanying instrument, name it and explain how it connects to the sound system.
How do technical rider requirements differ for solo vocals with backing tracks or instruments? A voice-only setup centres on the vocal microphone and its placement. Backing tracks require a playback connection, while an instrument needs its own input and position. List each source separately so the venue can prepare accordingly.
Keep the equipment schedule aligned with the stage plot: identify what the artist brings, what the venue supplies and any acceptable alternatives. This turns a general request into a workable plan for the sound team.
Stage plot and stage positions
A stage plot shows where the vocalist, microphone, monitor and any instruments or playback equipment belong. For a solo vocalist, the rider should also state soundcheck requirements: two and a half hours is preferred for onstage technical setup, with a minimum of two hours when the projector and sound system are already running.
Stage Positions and Layout
A stage plot is a visual map of the performer and equipment positions. It helps the venue team prepare a stage that suits both the performance arrangement and event design. Mark the vocalist’s position in relation to the audience, microphone, monitor and any instrument or playback source. Show amplifier positions, if used, and note whether bass or keyboard amplifiers will be mic’d or run direct.
Send an accurate stage plot to the venue well in advance. A simple diagram can clarify entrances, sightlines and the space the vocalist needs. A solo recital with keyboard accompaniment, for example, requires a different layout from a vocalist standing alone with a microphone. Show the actual arrangement rather than relying on a generic template.
Stage Plot and Input List
The stage plot shows where equipment sits; the input list tells the sound team how each source connects. Together, they match physical positions with the channels prepared for soundcheck. Identify each input, its instrument or equipment, preferred microphone or DI, and any positioning notes. The list can also specify the stage position and the input used on the stage box.
For example, a keyboard input list may call for two XLR connections routed through a DI to the mixing board. Label both connections so the engineer can prepare the correct inputs and match them to the keyboard’s position. Include the requested quantities of microphones, DIs, monitors and cables, giving the crew an equipment count as well as a visual layout.
Stage Power Outlets
Power requirements belong on the stage plan, with outlet locations marked beside the equipment that needs them. This lets the crew assess cable routes and position powered equipment without obscuring the vocalist’s path. One specific performance setup requires 10 AC outlets where Pierre Hébert sits, plus one piano bench or an armless chair. These are setup-specific details, not standard requirements for every vocalist.
For your event, note which equipment needs power and where the performer will be positioned. If a chair or bench is required, specify its placement on the same plan. The example of 10 outlets makes the value of precise documentation clear: a count and location give the venue team actionable information before the stage is set.
Use the rider’s timing details to coordinate the stage plot with soundcheck. The preferred two-and-a-half-hour setup allows time for the technical arrangement; the two-hour minimum assumes the projector and sound system are already running. These timings help planners coordinate stage access with the wider event schedule.
PA, monitors, console, and sound engineer
The rider should identify the sound system, monitoring and engineer support needed for the vocal performance. For PA and audio rental in the United States, costs depend on the equipment required, room size, coverage and staffing. An itemized quote can show how those needs shape the total.
PA and Monitor Requirements
A PA carries the performance sound to the audience, while monitors let the vocalist hear the mix on stage. Naming both requirements helps the venue prepare for the room and the performer. State whether the vocalist needs a floor monitor and describe its preferred position, so it supports clear monitoring without obstructing the performance space.
Match the PA specification to the venue rather than treating an example as a universal rule. One sample requirement gives a minimum 5000-watt PA for a 500-capacity room. That example shows the value of stating system capacity and room context together. If lighting has a preferred look or cue, include it separately, so the sound engineer can distinguish audio needs from production preferences.
Microphones, DI Boxes, and Cables
List the microphones, DI boxes and cables required for each sound source. This gives the engineer a clear inventory and helps prevent missing connections during setup. A solo voice with backing tracks, for example, needs a vocal microphone and playback connection; an instrument adds its own input and any required DI.
Specify quantities and purpose instead of writing “standard equipment.” The stage plot should show how many microphones, DIs, monitors and cables the venue is expected to provide. If a keyboard or another source needs a particular connection, name it in the input list. The engineer can then match each cable and input to the correct source.
Console and Sound Engineer
The console is the control point for balancing the vocal, playback and other inputs; the sound engineer prepares and manages the mix. State console expectations and engineer responsibilities so the production team can assign appropriate support. A show with broader production requirements may also specify a front-of-house mixing console, preferred lighting and other technical details.
Give the engineer a clear input list and notes on the desired vocal balance, monitor mix and playback cues. An engineer may review the rider a day or two before the show, allowing time to understand the setup before soundcheck. Distinguish preferences from essential requirements so the engineer can prioritize what matters most to the performance.
At soundcheck, the engineer tests the microphone, monitors and playback through the PA. The vocalist can, for example, confirm from the stage position that the voice remains clear over the backing track. A precise rider supports this test by identifying the sources and equipment in advance, rather than leaving the engineer to infer the arrangement.
What is a Technical Rider and why do I need one?
A technical rider gives the venue team the practical information needed to prepare an artist’s performance. For you, it turns sound and setup expectations into a shared plan for the production team.
Sound Engineer Communication
The rider is a concise technical brief for the sound engineer, stage manager and venue team. It gives everyone the same performance requirements to work from, rather than leaving them to interpret separate instructions. Name the artist’s sound sources, describe the preferred setup, and distinguish essential needs from preferences.
For example, identify the vocal microphone, any playback source and the intended monitor arrangement. Pair these details with a stage plot and input list so the engineer can connect each source to its planned position. Use clear labels instead of shorthand only the artist understands. A readable document supports precise communication across the production team.
Music and sound references can clarify the character of a performance. Include the relevant track title, artist or recording, and the passage that best represents the desired sound. If a backing track is part of the arrangement, distinguish it from reference material. This helps the engineer understand both what will be performed and what should guide the sound, without confusing the two.
Keep the tone professional and requests specific. “Vocal prominent over playback” communicates more than “make it sound good.” Label flexible preferences as such. This lets the engineer prioritize the performance’s core needs while accommodating the venue’s equipment and room.
Load-In and Soundcheck Preparation
The rider supports load-in by showing what equipment is arriving, where it belongs and what the venue must prepare. A missing item or unclear placement can disrupt the transition from setup to soundcheck. Review the equipment division with the venue representative before the event and resolve any gaps in advance.
For instance, confirm that the listed microphone, playback connections and stage positions match the planned arrangement. Avoid discovering a missing item at soundcheck, three hours beforehand. A clear rider gives the venue team time to address gaps earlier, while the artist can arrive knowing how the setup is intended to proceed.
Use the rider to separate load-in tasks from soundcheck tasks. The stage team can place equipment and route connections first; the engineer can then test the vocal and playback in their intended positions. If the programme includes a scheduled entrance or transition, note it so the production team can coordinate technical preparation with the event flow.
Before sending the document, compare its equipment list, stage plot and sound references. A named track should match the intended playback source, and each listed input should reflect the performance setup. This final review gives the sound engineer a coherent brief and helps your event team prepare a polished vocal moment.
Purpose and timing of a technical rider
A technical rider is a working document for the practical production of an artist’s show. It keeps performance requirements aligned with the show format, venue and event schedule. Treat it as a production reference that needs updating when those details change, rather than a fixed form prepared once and forgotten.
A working document, not a fixed form
The right level of detail depends on the performance setup. A voice-only recital needs different production notes from a performance with playback, instruments or visual elements. Keep the rider focused on requirements that affect the show, and make each request specific enough to guide the venue team.
For a multi-artist event, combined artist riders rarely exceed 5 pages. Keep each artist’s information identifiable within the shared document, so the production team can distinguish one set of requirements from another. Clear labels also help when the running order changes or the stage must be prepared for successive performances.
Think of the rider as a link between artistic intention and the production plan. A runway entrance, for example, may depend on a particular cue and stage position. Recording that detail helps the event team connect the performance to the programme without cluttering the technical document.
When to revise and circulate it
Update the rider at least annually or whenever the technical setup changes significantly. A revised arrangement, new equipment or different performance format can make an older document misleading. Add a revision date and identify the current version, giving the venue team and artist one shared reference.
Review the document against the performance being planned, not simply the last event. Confirm that the stage arrangement, equipment responsibilities and sound sources reflect the current production. If a requirement has become a preference, label it accordingly. This helps the team understand which details are essential to the performance.
How timing shapes the event plan
The rider also helps fit technical preparation into the wider event schedule. A soundcheck, stage reset or performance cue can affect the activities around the vocalist. Share the intended event flow with the production team, especially when the performance opens a programme or follows a visual presentation.
For an international engagement, the event schedule may also need to account for the international visa timeline, the period required to secure work permits for artists traveling abroad for performances. Aligning production planning with those arrangements supports a more coherent preparation process. To shape a bespoke vocal moment around your event’s purpose, discuss your performance concept with Catwalk Opera.
Catwalk Opera: Luxury Opening Moment
Catwalk Opera’s Luxury Opening Moment is designed for planners seeking a focused vocal entrance that sets the tone for a luxury gala, fashion presentation or brand event. Lasting 10-12 minutes, it can create a refined opening within your event flow, with the performance curated to complement the occasion’s atmosphere and visual direction.
As you prepare the technical rider, align the vocal moment with its planned stage position, sound setup and programme cue. This gives your production team a clear framework for placing the performance within the evening. For a fashion-led presentation or intimate gathering, the Signature Fashion Opera Experience and Private Royal Recital offer distinct formats.
Contact Catwalk Opera to discuss the performance format for your event.
Shape the Performance Around Your Event Vision
As you plan your next event, let the technical rider connect practical preparation with creative intention. A clear brief gives the production team a framework while preserving the atmosphere you want guests to experience. A technical rider for a solo vocalist supports that balance when it reflects the performance’s purpose, visual setting and place in the programme.
Consider the moment you want the voice to create: a poised opening, a dramatic transition or an intimate pause in the evening. That artistic choice can guide how the performance fits your event design. With the creative direction in mind, explore a format suited to your occasion and its audience.
Share your event vision with Catwalk Opera and explore how a live vocal performance might complement your plans. A considered creative direction can help your event leave a lasting impression.
Frequently Asked Questions
What is an artist rider?
An artist rider is an agreement document describing practical conditions for a particular performance. It can cover technical details as well as hospitality and scheduling preferences, making it broader than sound arrangements alone. For example, a singer’s rider might distinguish stage requirements from dressing-room requests. Clear categories help event planners direct each request to the right person.
What should a technical rider for a solo vocalist include?
Include information that helps the production team understand the specific performance. Note the artist’s name, event date, performance format and any cues that affect the programme. If the vocalist enters after a welcome speech, describe the transition in plain language. A brief note on the performance’s purpose can also help the event producer align it with the occasion’s mood and visual direction.
What microphone and vocal equipment does a solo singer need?
The right microphone depends on the vocalist’s established preference, performance style and movement on stage. A stationary recital and a presentation involving movement may call for different choices. The artist should communicate familiar equipment preferences and describe the performance context, rather than name a model without explanation. This gives the production team useful guidance while leaving room for a compatible setup.
What PA system and speaker setup is suitable for a solo vocalist?
A suitable speaker arrangement should reach audience areas clearly while respecting the room’s layout and sightlines. A long reception space, for example, distributes guests differently from a compact recital room. Ask the production team to consider where guests will be seated or standing and whether architectural features could affect sound coverage. The audience layout matters as much as the performance itself.
What are typical stage monitor and in-ear monitor requirements for a solo singer?
The vocalist’s preferred monitoring approach should reflect their familiarity and performance style. A singer who stays in one position may prefer a different arrangement from someone moving through the room. State whether the performance includes accompaniment and what the artist needs to hear clearly. Soundcheck can then assess the performer’s listening experience in the actual position, rather than relying only on the view from the mixing area.
What audio mixer, input channels, and signal processing should a solo vocalist request?
Describe the desired result instead of prescribing a complex signal-processing chain. For example, say that the voice should retain natural detail and remain distinct from the accompaniment. This gives the engineer an artistic reference without dictating a technical method. The appropriate mixer configuration depends on the performance sources and production plan, so requests should reflect the actual arrangement rather than a generic specification.
What power, cabling, and DI box requirements should be listed in a vocalist’s rider?
For a practical plan, identify where powered equipment will sit and consider how cables appear in guest sightlines and event photography. A runway-side performance, for example, may need a different cable route from a seated recital. Keep connection requirements consistent with the actual playback or instrument equipment. Clear placement notes help the crew plan discreet routes that preserve stage access and the setting’s visual composition.
What common technical rider mistakes and venue compatibility issues should solo vocalists avoid?
A common oversight is planning the technical arrangement without considering the room’s design or the event’s visual concept. A microphone stand, speaker position or cable route can interrupt a carefully composed runway view or formal stage picture. Review the rider alongside the event layout and make sure the performance format suits the available stage arrangement. Clear priorities help the production team adapt the setup without losing the intended effect.